The history behind the C128Neo
I received my first own computer on my tenth birthday, a shiny brand new Commdore 128. As most kids in the 80s I then spend hours and days playing games and enjoying myself. Over time however I started getting interested all the other things that were mentioned in the manual that came with the system. This was the start of my career working in IT so you could fairly reasonably state that the C128 hand book has been in some ways the most influential book in my life.
Over time I started realising that you need to do something else than basic to copy all of those cool intros you save in front of the games you playes, so assembly was poked at and learned. I never got really good at it but it didn’t really matter. The joy of your first smooth scroller was immense!
As time moved on, I moved on to the Amiga like most kids in our area. The trusty old friend was stuck in a cupboard and largely forgotten about. Through pure luck I’ve never gotten rid of it, it’s been dragged along with all my house moves and other things in life, not used but not forgotten entirely.
Existing projects
Nearly 35 years later, I was roaming the internet and ran across the ReAmiga project by John “Chucky” Hertell. This tickled my interest as one of the Amigas I used to own and use as a daily driver was an A3000D. I also found and bought the A500++ reverse engineered board by Rob “Peepo” Taylor, having a lot of fun putting one together while reminiscing of my first Amiga. Sometime later I ran across a youtube video by James Lewis called Preserving History with KiCad where he talks about preserving the schematics of retro computing platforms using open source software and it struck a chord with me.
The 128RM
I have seen a lot of work on the C64s in all its various forms but I had never seen anyone trying to replicate the C128. Some Internet searching later and I had found the 128RM project which now sadly seems to have petered out. While very interesting it didn’t really match what I wanted:
- No colour on the 80 column.
- Not possible to use two monitors at the same time.
- No full C128 keyboard.
I can understand the design choices made in this project, such as using the now readily available C64c cases. However the compromises made to achieve this reduction in size and I/O area was for me intractable. Additionally I couldn’t see any indication at all that design files would at some point be released. As such, interesting for sure but not for me.
C128 Community Edition
I also found the reverse engineering project from Jörgen Olsson, the C128 Community Edition. It was much more interesting but I also wanted to preserve the schematics, not just the PCB itself.
So, I set out to do my own replica board. I have some previous electronics experience so I figured I could pull it off. As software, KiCad was selected for pretty much the same reasons as presented by mr. Lewis. Hardware preservation needs to be done using open source software to ensure that the data files can be read in the future regardless of vendors and their whims. Having selected the software, I had to figure out a workflow that would function. I based the work on a rev 9 PCB, which to my knowledge was the last wedge shaped C128 board that was released, not counting the rare-ish C128CR. The matching schematics is Rev 7A which is readily available in the service manual and the C128 Programmers Reference Guide among other places. I grabbed my copy from the excellent service provided by Bo Zimmerman.
Schematic capture
With this, I started laying out the schematic in KiCad. This took some time as the symbolics and ways you do schematics have changed quite a bit since the original C= schematics were created. As and example, here are parts of the VIC IIe sections from the original and new schematics:
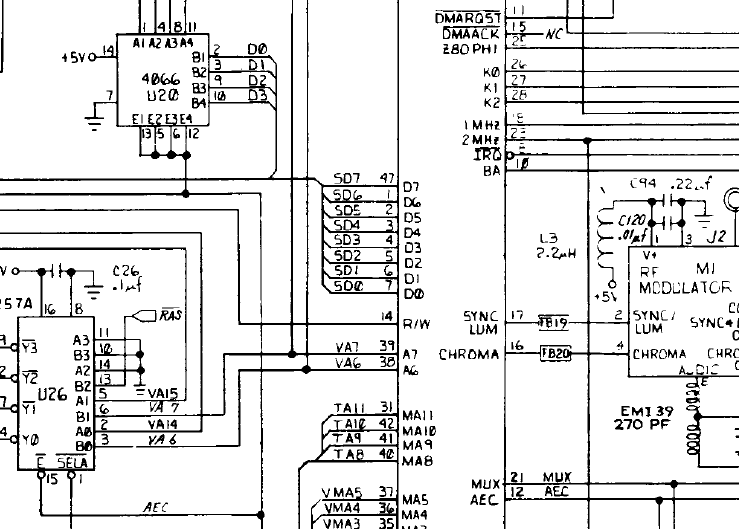
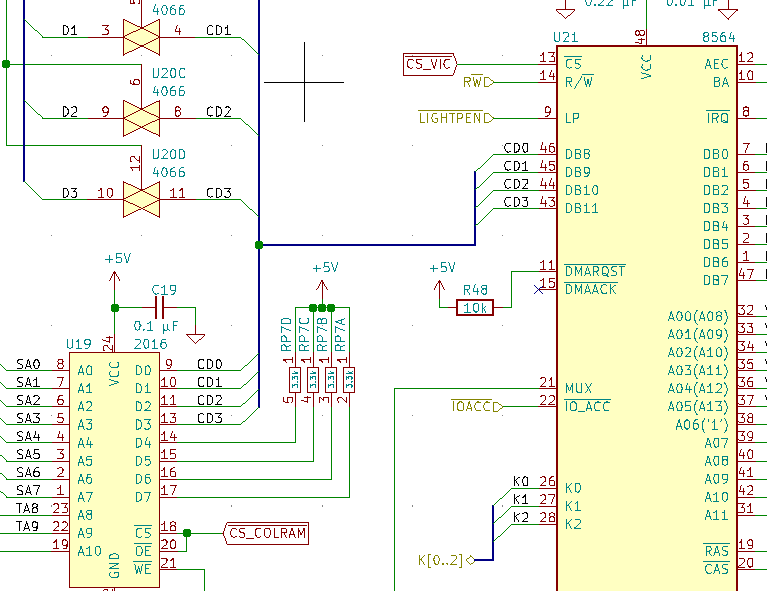
As can be seen with for example U20, there are differences in how things are done. This meant that it would not be feasible to make a direct copy of the original schematics in KiCad, so this was not even attempted.
This work took a few weeks of evening and weekends, checking and double checking everything that was put in against both the original schematics and also an actual C128 board to validate or clarify when unsure.
These schematics will also be released once I’m happy with the state of them.
With all of this done it was time to move on to laying out the board, which I will talk about in the next post as this is getting long enough already.